En esta entrada, vamos a ver cómo crear un videojuego con Python y pygame. El videojuego se llama Bullet dodger. El objetivo es esquivar todas las balas que se disparen para conseguir el mayor número de puntos posibles. Cada bala disparada aumenta la puntuación en 1. El personaje se maneja con el ratón, y el juego tiene un modo de pantalla completa.
Antes de comenzar a programar, debes asegurarte de que tienes todos los
materiales necesarios. Solamente necesitas pygame,
Python y un editor de texto o IDE con el que
te sientas cómodo. Abajo tienes la bala que utilizaremos para el juego;
descárgala y ubícala en la carpeta donde vayas a programar.
![]()
Paso 1: Crear ventana básica
Lo primero que hay que hacer para utilizar pygame, es importarlo.
Normalmente son necesarias las librerías pygame y pygame.locals.
Crea un archivo de llamado main.py e importa dichas librerías.
#!/usr/bin/env python
# -*- coding: utf-8 -*-
from pygame.locals import *
import pygame
Una vez importado todo lo necesario, podemos crear el videojuego. Lo primero es hacer la ventana.
pygame.init()
# Display
screen = pygame.display.set_mode((800, 600))
# Window titlebar
pygame.display.set_caption('Bullet dodger')
pygame.display.set_icon(pygame.image.load('bullet.png'))
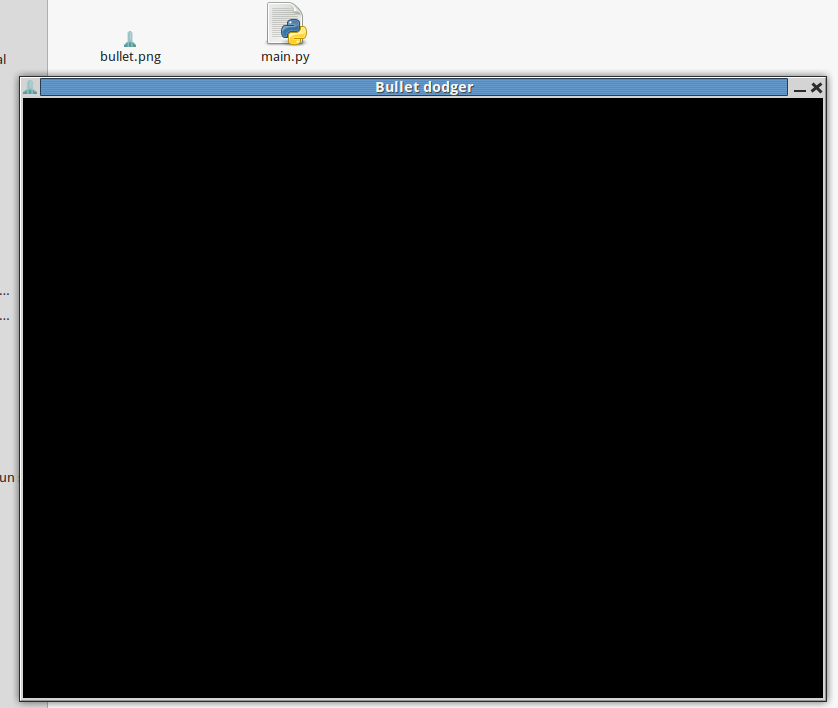
Hemos iniciado pygame. Después, hemos establecido la resolución a
800x600 píxeles y, por último, hemos creado el título de nuestra ventana
y le hemos asignado como icono la imagen de la bala que hemos
descargado. Cuando lo ejecutemos, va a aparecer una ventana negra que se
cerrará inmediatamente, porque cuando termina la última instrucción el
programa ya no tiene nada más que hacer y finaliza.
Para evitar esto necesitamos que el programa se ejecute hasta que el
usuario decida cerrarlo. Para ello vamos a crear el bucle del juego.
Dentro de ese bucle, vamos a comprobar si el usuario ha realizado alguna
acción. Si la acción realizada es la de cerrar la ventana
(event.type == QUIT), pygame parará y la variable running tendrá el
valor False; por lo que se saldrá del bucle y se finalizará el
programa.
running = True
while running:
    for event in pygame.event.get():
        if event.type == QUIT:
            running = False
pygame.quit()
A continuación os dejo el código fuente completo.
#!/usr/bin/env python
# -*- coding: utf-8 -*-
from pygame.locals import *
import pygame

pygame.init()
# Display
screen = pygame.display.set_mode((800, 600))
# Window titlebar
pygame.display.set_caption('Bullet dodger')
pygame.display.set_icon(pygame.image.load('bullet.png'))
running = True
while running:
    for event in pygame.event.get():
        if event.type == QUIT:
            running = False
pygame.quit()
Paso 2: Crear la pantalla de inicio
Vamos a crear un archivo en el que ubicaremos algunas constantes
importantes en pygame: los colores y la resolución de la ventana. El
archivo se llamará global_constants.py.
#!/usr/bin/env python
# -*- coding: utf-8 -*-

# Resolution
WIDTH = 800
HEIGHT = 600

# Colors
BLACK = (0, 0, 0)
GREEN = (0, 255, 0)
RED = (255, 0, 0)
YELLOW = (255, 255, 12)
La anchura (WIDTH) será de 800 píxeles; la altura (HEIGHT), de 600.
Los colores en pygame son una tupla de tres valores: rojo, verde y
amarillo (de ahí las siglas
RGB). Vamos a crear los
colores negro, verde, rojo y amarillo.
Ahora que hemos creado unas variables para la resolución, podemos
utilizarlas en main.py. Vamos a añadir también un tipo de fuente para
escribir texto normal (un poco más adelante veremos cómo funciona el
constructor pygame.font.Font).
#!/usr/bin/env python
# -*- coding: utf-8 -*-
from pygame.locals import *
import pygame

from global_constants import *

pygame.init()
# Display
screen = pygame.display.set_mode((WIDTH, HEIGHT))
fullscreen = False
# Window titlebar
pygame.display.set_caption('Bullet dodger')
pygame.display.set_icon(pygame.image.load('bullet.png'))

default_font = pygame.font.Font(None, 28)
Ahora vamos a crear una función para escribir texto en pygame.
def draw_text(text, font, surface, x, y, main_color, background_color=None):
    textobj = font.render(text, True, main_color, background_color)
    textrect = textobj.get_rect()
    textrect.centerx = x
    textrect.centery = y
    surface.blit(textobj, textrect)
La función la hemos llamado draw_text. Tiene como parámetros el texto
que queramos escribir, el tipo de fuente, la superficie donde queremos
que se escriba el texto, las coordenadas (x y y), el color de las
letras y el color de fondo tras las letras (background_color=None,
opcional).
Dentro de la función hemos creado el objeto de texto, con la función
font.render utilizando los parámetros. Con el objeto de texto, hemos
accedido a las coordenadas rectangulares y las hemos modificado con los
valores de y y x. Una vez hecho esto, podemos dibujar el texto en la
superficie (surface.blit(textobj, textrect)).
Ahora crearemos la función de la pantalla de inicio del juego en
main.py.
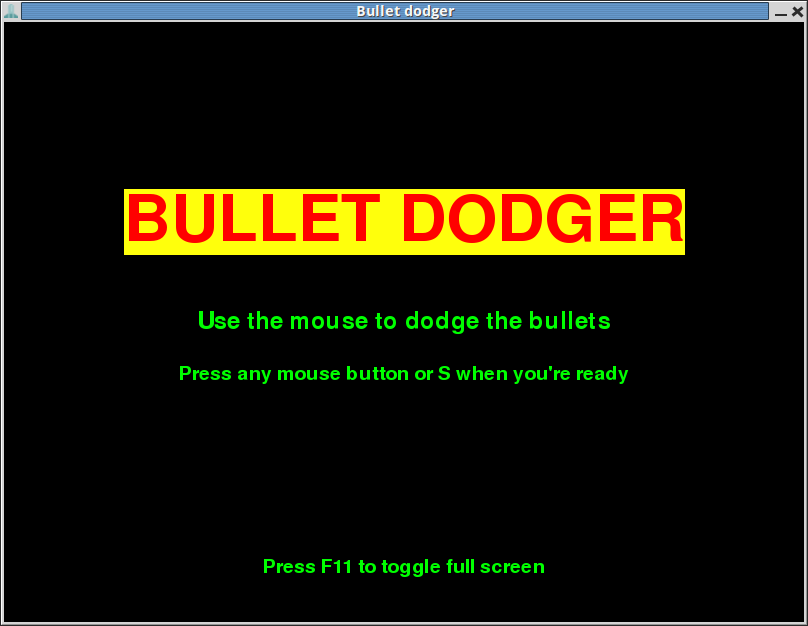
def start_screen():
    pygame.mouse.set_cursor(*pygame.cursors.diamond)
    while True:
        title_font = pygame.font.Font('freesansbold.ttf', 65)
        big_font = pygame.font.Font(None, 36)
        draw_text('BULLET DODGER', title_font, screen,
                  WIDTH / 2, HEIGHT / 3, RED, YELLOW)
        draw_text('Use the mouse to dodge the bullets', big_font, screen,
                  WIDTH / 2, HEIGHT / 2, GREEN, BLACK)
        draw_text('Press any mouse button or S when you\'re ready',
                  default_font, screen, WIDTH / 2, HEIGHT / 1.7, GREEN, BLACK)
        draw_text('Press F11 to toggle full screen', default_font, screen,
                  WIDTH / 2, HEIGHT / 1.1, GREEN, BLACK)
        pygame.display.update()
        for event in pygame.event.get():
            if event.type == pygame.MOUSEBUTTONDOWN:
                main_loop()
                return
            elif event.type == pygame.KEYDOWN:
                if event.key == pygame.K_s:
                    main_loop()
                    return
            if event.type == QUIT:
                return
Con pygame.mouse.set_cursor(*pygame.cursors.diamond), hacemos que el
ratón tenga forma de diamante cuando pasas el ratón por la ventana del
juego. Después creamos otros dos tipos de fuentes, con diferentes
tamaños. El tipo de fuente es freesansbold.ttf, que es la fuente
predeterminada de pygame. Pasar None como primer parámetro del
constructor Font tiene es equivalente a pasar 'freesansbold.ttf'; el
segundo parámetro hace referencia al tamaño de la fuente. La función
draw_text que creamos anteriormente permite crear varios textos
fácilmente. Para que se muestren los textos, debemos ejecutar
pygame.display.update(). Después creamos un bucle para capturar los
eventos. Si el usuario pulsa cualquier botón del ratón o la tecla S se
ejecutará la función main_loop(), que aún no hemos creado. Si el
usuario cierra la ventana, Python saldrá de la función.
Creemos la función main_loop. Simplemente mete el bucle del juego que
creamos anteriormente dentro de la función tal que quede como abajo.
def main_loop():
    running = True
    while running:
        for event in pygame.event.get():
            if event.type == QUIT:
                running = False
Ahora solo añade al debajo de todas las funciones creadas una llamada a
start_screen() y otra llamada a pygame.quit() (sirve para cerrar el
motor de pygame). El archivo main.py debe haberte quedado como lo
muestro continuación.
#!/usr/bin/env python
# -*- coding: utf-8 -*-
from pygame.locals import *
import pygame

from global_constants import *

pygame.init()
# Display
screen = pygame.display.set_mode((WIDTH, HEIGHT))
# Window titlebar
pygame.display.set_caption('Bullet dodger')
pygame.display.set_icon(pygame.image.load('bullet.png'))

default_font = pygame.font.Font(None, 28)

def draw_text(text, font, surface, x, y, main_color, background_color=None):
    textobj = font.render(text, True, main_color, background_color)
    textrect = textobj.get_rect()
    textrect.centerx = x
    textrect.centery = y
    surface.blit(textobj, textrect)


def start_screen():
    pygame.mouse.set_cursor(*pygame.cursors.diamond)
    while True:
        title_font = pygame.font.Font('freesansbold.ttf', 65)
        big_font = pygame.font.Font(None, 36)
        draw_text('BULLET DODGER', title_font, screen,
                  WIDTH / 2, HEIGHT / 3, RED, YELLOW)
        draw_text('Use the mouse to dodge the bullets', big_font, screen,
                  WIDTH / 2, HEIGHT / 2, GREEN, BLACK)
        draw_text('Press any mouse button or S when you\'re ready',
                  default_font, screen, WIDTH / 2, HEIGHT / 1.7, GREEN, BLACK)
        draw_text('Press F11 to toggle full screen', default_font, screen,
                  WIDTH / 2, HEIGHT / 1.1, GREEN, BLACK)
        pygame.display.update()
        for event in pygame.event.get():
            if event.type == pygame.MOUSEBUTTONDOWN:
                main_loop()
                return
            elif event.type == pygame.KEYDOWN:
                if event.key == pygame.K_s:
                    main_loop()
                    return
            if event.type == QUIT:
                return


def main_loop():
    running = True
    while running:
        for event in pygame.event.get():
            if event.type == QUIT:
                running = False

start_screen()
pygame.quit()
Paso 3: Crear el modo de pantalla completa
En el menú principal del juego vamos a permitir cambiar a un modo de
pantalla completa pulsando F11. Para ello tenemos que crear la función
toggle_fullscreen(). Antes vamos a crear una variable llamada
fullscreen y vamos a darle el valor False.
# Display
screen = pygame.display.set_mode((WIDTH, HEIGHT))
fullscreen = False
Creemos ya la función toggle_fullscreen().
def toggle_fullscreen():
    if pygame.display.get_driver() == 'x11':
        pygame.display.toggle_fullscreen()
    else:
        global screen, fullscreen
        screen_copy = screen.copy()
        if fullscreen:
            screen = pygame.display.set_mode((WIDTH, HEIGHT))
        else:
            screen = pygame.display.set_mode((WIDTH, HEIGHT), pygame.FULLSCREEN)
        fullscreen = not fullscreen
        screen.blit(screen_copy, (0, 0))
Si el ordenador del usuario tiene el controlador de vídeo x11, ejecutará
la función pygame.display.toggle_fullscreen(). Si no dispone de ese
driver la anterior función no fuencionará, así que utilizamos otro
método. En este, tenemos que hacer globales las variables screen y
fullscreen para poder cambiar sus valores. Hacemos una copia de la
variable screen, si el valor de la variable fullscreen es False,
cambiaremos a pantalla completa con screen =
pygame.display.set_mode((WIDTH, HEIGHT), pygame.FULLSCREEN); en caso
contrario, volveremos al modo normal. Cambiamos el valor de la variable
fullscreen (si es True pasará a False; si es False, a True). La
copia de la variable screen, debemos dibujarla en screen, ya que al
cambiar el modo de muestra (display.set_mode) se perderán los valores
antiguos.
Dememos permitir llamar a esta función pulsando la tecla F11 en la
función start_screen().
for event in pygame.event.get():
    if event.type == pygame.MOUSEBUTTONDOWN:
        main_loop()
        return
    elif event.type == pygame.KEYDOWN:
        if event.key == pygame.K_s:
            main_loop()
            return
        if event.key == K_F11:
            toggle_fullscreen()
    if event.type == QUIT:
        return
Paso 4: Crear las balas
Crea un archivo llamado bullet.py.
#!/usr/bin/env python
# -*- coding: utf-8 -*-
import random

from pygame.locals import *
import pygame

from global_constants import WIDTH, HEIGHT


def random_bullet(speed):
    random_or = random.randint(1, 4)
    if random_or == 1:  # Up -> Down
        return Bullet(random.randint(0, WIDTH), 0, 0, speed)
    elif random_or == 2:  # Right -> Left
        return Bullet(WIDTH, random.randint(0, HEIGHT), -speed, 0)
    elif random_or == 3:  # Down -> Up
        return Bullet(random.randint(0, WIDTH), HEIGHT, 0, -speed)
    elif random_or == 4:  # Left -> Right
        return Bullet(0, random.randint(0, HEIGHT), speed, 0)


class Bullet(pygame.sprite.Sprite):

    def __init__(self, xpos, ypos, hspeed, vspeed):
        super(Bullet, self).__init__()
        self.image = pygame.image.load('bullet.png')
        self.rect = self.image.get_rect()
        self.rect.x = xpos
        self.rect.y = ypos
        self.hspeed = hspeed
        self.vspeed = vspeed

        self.set_direction()

    def update(self):
        self.rect.x += self.hspeed
        self.rect.y += self.vspeed
        if self.collide():
            self.kill()

    def collide(self):
        if self.rect.right < 0 or self.rect.x > WIDTH:
            return True
        elif self.rect.right < 0 or self.rect.y > HEIGHT:
            return True

    def set_direction(self):
        if self.hspeed > 0:
            self.image = pygame.transform.rotate(self.image, 270)
        elif self.hspeed < 0:
            self.image = pygame.transform.rotate(self.image, 90)
        elif self.vspeed > 0:
            self.image = pygame.transform.rotate(self.image, 180)
Este es el código que necesitamos para crear balas. La función
random_bullet.py sirve para crear una bala con una dirección aleatoria
(hay cuatro: de arriba abajo, de derecha a izquierda, de abajo arriba y
de izquierda a derecha). Podemos controlar la velocidad a través del
parámetro speed. En esta función utilizamos las variables WIDTH y
HEIGHT para que las balas se creen justo en el borde fuera de la
ventana del juego.
Más abajo creamos la clase Bullet, que hereda de pygame.sprite.Sprite.
En el constructor (__init__) llamamos al constructor de la clase
padre, establecemos la imagen de la bala, las coordenadas rectangulares
y la velocidad horizontal (hspeed) y vertical (vspeed). Finalmente
llamamos a la función set_direction().
La función set_direction(), simplemente gira la imagen para que la
imagen de la bala no de una apariencia de movimiento equivocada. Es
decir, si la bala se mueve hacia abajo, se gira la imagen 180º, puesto
que la imagen de la bala está mirando hacia arriba.
La función collide(), devuelve True si la bala ha salido de la
pantalla.
La función update() simplemente actualiza la posición de la bala y la destruye si ha salido de la pantalla.
Vamos a crear en el archivo main.py las balas para comprobar que
funciona el código escrito. Pero antes tenemos que controlar los
fotogramas por segundos, sino el juego correrá a una velocidad diferente
dependiendo de la potencia del ordenador que lo arranque. Escribe en la
parte superior del archivo
pygame.display.set_caption('Bullet dodger')
pygame.display.set_icon(pygame.image.load('bullet.png'))
# Timing
fps_clock = pygame.time.Clock()
FPS = 60

default_font = pygame.font.Font(None, 28)
En el bucle del juego, escribe lo siguiente.
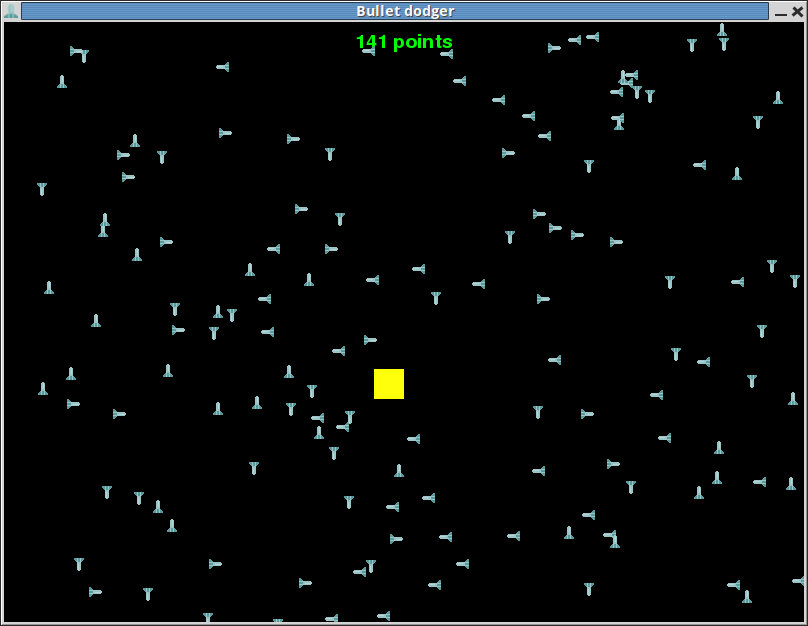
def main_loop():
    bullets = pygame.sprite.Group()
    running = True
    points = 0
    while running:
        pygame.display.update()
        fps_clock.tick(FPS)
        screen.fill(BLACK)

        if random.randint(1, 5) == 1:
            bullets.add(random_bullet(random.randint(1, 1)))
            points += 1
        draw_text('{} points'.format(points), default_font, screen,
            WIDTH / 2, 20, GREEN)
        bullets.update()
        bullets.draw(screen)
Primero, hemos creado un grupo de sprites llamado bullets para organizar
más fácilmente las balas. Hemos creado una variable llamada points que
vale 0 al inicio de la partida. Actualizamos la pantalla con
pygame.display.update(). Ejecutamos la función tick() para que el
juego no pase de los
FPS que hemos
especificado antes. Después llenamos la pantalla de negro (si no hacemos
esto las balas se dibujarán y no se borrarán de su posición antigua).
Para que no salgan demasiadas balas de golpe creamos una condición, con
if random.randint(1, 5) == 1 hay un 20% de posibilidades de que se
dispare una bala y aumente la puntuación en 1 en cada iteración. Fuera
de ese if, dibujamos la puntuación actual, actualizamos las balas y
las dibujamos en la pantalla.
Para que el código funcione deberás importar el módulo random y todo lo
del archivo bullet.py (from bullet import *). Así deberá quedar el
código del archivo main.py
#!/usr/bin/env python
# -*- coding: utf-8 -*-
import random

from pygame.locals import *
import pygame

from bullet import *
from global_constants import *

pygame.init()
# Display
screen = pygame.display.set_mode((WIDTH, HEIGHT))
fullscreen = False
# Window titlebar
pygame.display.set_caption('Bullet dodger')
pygame.display.set_icon(pygame.image.load('bullet.png'))
# Timing
fps_clock = pygame.time.Clock()
FPS = 60

default_font = pygame.font.Font(None, 28)


def draw_text(text, font, surface, x, y, main_color, background_color=None):
    textobj = font.render(text, True, main_color, background_color)
    textrect = textobj.get_rect()
    textrect.centerx = x
    textrect.centery = y
    surface.blit(textobj, textrect)


def toggle_fullscreen():
    if pygame.display.get_driver() == 'x11':
        pygame.display.toggle_fullscreen()
    else:
        global screen, fullscreen
        screen_copy = screen.copy()
        if fullscreen:
            screen = pygame.display.set_mode((WIDTH, HEIGHT))
        else:
            screen = pygame.display.set_mode((WIDTH, HEIGHT), pygame.FULLSCREEN)
        fullscreen = not fullscreen
        screen.blit(screen_copy, (0, 0))


def start_screen():
    pygame.mouse.set_cursor(*pygame.cursors.diamond)
    while True:
        title_font = pygame.font.Font('freesansbold.ttf', 65)
        big_font = pygame.font.Font(None, 36)
        default_font = pygame.font.Font(None, 28)
        draw_text('BULLET DODGER', title_font, screen,
                  WIDTH / 2, HEIGHT / 3, RED, YELLOW)
        draw_text('Use the mouse to dodge the bullets', big_font, screen,
                  WIDTH / 2, HEIGHT / 2, GREEN, BLACK)
        draw_text('Press any mouse button or S when you\'re ready',
                  default_font, screen, WIDTH / 2, HEIGHT / 1.7, GREEN, BLACK)
        draw_text('Press F11 to toggle full screen', default_font, screen,
                  WIDTH / 2, HEIGHT / 1.1, GREEN, BLACK)
        pygame.display.update()
        for event in pygame.event.get():
            if event.type == pygame.MOUSEBUTTONDOWN:
                main_loop()
                return
            elif event.type == pygame.KEYDOWN:
                if event.key == pygame.K_s:
                    main_loop()
                    return
                if event.key == K_F11:
                    toggle_fullscreen()
            if event.type == QUIT:
                return


def main_loop():
    bullets = pygame.sprite.Group()
    running = True
    points = 0
    while running:
        pygame.display.update()
        fps_clock.tick(FPS)
        screen.fill(BLACK)

        if random.randint(1, 5) == 1:
            bullets.add(random_bullet(random.randint(1, 1)))
            points += 1
        draw_text('{} points'.format(points), default_font, screen,
            WIDTH / 2, 20, GREEN)
        bullets.update()
        bullets.draw(screen)

        for event in pygame.event.get():
            if event.type == QUIT:
                running = False

start_screen()
pygame.quit()

Paso 5: Crear el personaje
Crea un archivo llamado block.py con el código que aparece a
continuación.
#!/usr/bin/env python
# -*- coding: utf-8 -*-
import pygame
from pygame.locals import *

from global_constants import YELLOW


class Block(pygame.sprite.Sprite):
    def __init__(self):
        super(Block, self).__init__()
        self.img = pygame.Surface((30, 30))
        self.img.fill(YELLOW)
        self.rect = self.img.get_rect()
        self.centerx = self.rect.centerx
        self.centery = self.rect.centery

    def set_pos(self, x, y):
        'Positions the block center in x and y location'
        self.rect.x = x - self.centerx
        self.rect.y = y - self.centery

    def collide(self, sprites):
        for sprite in sprites:
            if pygame.sprite.collide_rect(self, sprite):
                return True
Para crear el personaje no nos hemos complicado mucho: simplemente hemos creado un cuadrado amarillo.
Aparte de importar lo típico en pygame (líneas 3 y 4), importamos de
global_constants.py la variable YELLOW para el color del cuadrado.
Hemos creado una clase llamada Block, que como Bullet, hereda de
pygame.sprite.Sprite. En el constructor, ejecutamos el constructor de
la clase padre, creamos una superficie de 30x30 píxeles, la coloreamos
de amarillo y obtenemos y guardamos el centro de la coordenadas del
cuadrado. Nos interesa el centro, porque cuando creemos movamos el
cuadrado con el ratón, el ratón siempre estará en el centro del cuadrado
para hacer que el movimiento sea natural (si no, nos moveríamos a partir
de la esquina superior izquierda del cuadrado).
El método set_pos, nos permitirá ubicar el cuadrado a partir de las
coordenadas que le pasemos como parámetro. El centro del cuadrado estará
en las coordenadas x y y.
El método collide devuelve True si el cuadrado colisiona con uno de
los sprites del grupo de sprites pasado como parámetro. La colisión se
calcula a partir de las coordenadas rectangulares
(pygame.sprite.collide_rect(self, sprite)), así que se detecta una
colisión cuando se produce una intersección entre los cuadrados de las
imagenes sin importar que una parte sea transparente.
En main.py, vamos a importar ahora lo que hemos creado en block.py.
from block import *
from bullet import *
from global_constants import *
En el archivo main.py ya podemos crear el cuadrado y lo ubicarlo
inicialmente a partir de las coordenadas del ratón. También vamos a
hacer que el ratón sea invisible durante la partida y vamos a crear la
variable game_over con el valor False (nos servirá más adelante para
detectar el fin del juego).
def main_loop():
    pygame.mouse.set_visible(False)

    square = Block()
    square.set_pos(*pygame.mouse.get_pos())
    bullets = pygame.sprite.Group()
    running = True
    game_over = False
Después comprobamos si ha colisionado con alguna bala, si lo ha hecho
hacemos que la variable game_over sea True. Dibujamos el cuadrado
con screen.blit(square.img, square.rect) y actualizamos la posición
del ratón cada vez que se mueve el ratón dentro del bucle for que
recorre los eventos de pygame.
    if square.collide(bullets):
        game_over = True

    screen.blit(square.img, square.rect)
    for event in pygame.event.get():
        if event.type == pygame.MOUSEMOTION:
            mouse_pos = pygame.mouse.get_pos()
            square.set_pos(*mouse_pos)
        if event.type == QUIT:
            running = False
Cuando hayamos terminado, podremos mover el cuadrado amarillo, pero no
sabremos si ha colisionado. Si quieres probar si funciona la detección
de colisiones antes de seguir, muestra algo por pantalla si se cumple la
condición
if square.collide(bullets):.
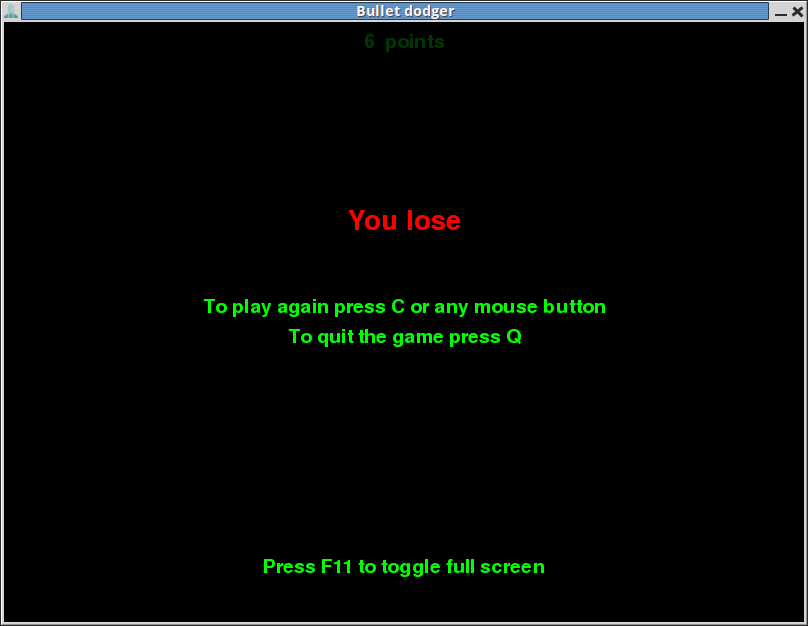
Paso 6: Crear la pantalla de fin del juego
Dentro del bucle del juego, detrás del bucle for donde detectamos antes
los movimientos del ratón, vamos a añadir un bucle que se va a ejecutar
mientras la variable game_over sea True.
while game_over:
    pygame.mouse.set_visible(True)
    # Text
    draw_text('{}  points'.format(points), default_font, screen,
              WIDTH / 2, 20, GREEN)
    # Transparent surface
    transp_surf = pygame.Surface((WIDTH, HEIGHT))
    transp_surf.set_alpha(200)
    screen.blit(transp_surf, transp_surf.get_rect())

    draw_text('You lose', pygame.font.Font(None, 40), screen,
              WIDTH / 2, HEIGHT / 3, RED)
    draw_text('To play again press C or any mouse button',
              default_font, screen, WIDTH / 2, HEIGHT / 2.1, GREEN)
    draw_text('To quit the game press Q', default_font, screen,
              WIDTH / 2, HEIGHT / 1.9, GREEN)
    draw_text('Press F11 to toggle full screen', default_font, screen,
              WIDTH / 2, HEIGHT / 1.1, GREEN, BLACK)

    pygame.display.update()

    for event in pygame.event.get():
        if event.type == pygame.KEYDOWN:
            if event.key == K_F11:
                toggle_fullscreen()
            if event.key == pygame.K_q:
                game_over = False
                running = False
            elif event.key == pygame.K_c:
                game_over = False
                main_loop()
                return  # Avoids recursion
        if event.type == pygame.MOUSEBUTTONDOWN:
            game_over = False
            main_loop()
            return
        if event.type == QUIT:
            game_over = False
            running = False
Dentro del bucle hemos hecho visible de nuevo el ratón y hemos añadido
textos que le indican al usuario lo que puede hacer en este menú. El
texto de la puntuación lo hemos puesto tras una superficie transparente
(transp_surf). Para que lo que hemos dibujado sea visible ejecutamos
el método pygame.display.update().
Después, hemos creado un bucle for para comprobar las acciones del usuario. Si el usuario pulsa F11, se cambiará el juego a modo de pantalla completa; si pulsa la tecla Q o cierra la ventana, la variable game_over será False, por lo que se saldrá de este bucle y del juego; si pulsa la tecla C o pulsa un botón del ratón, el usuario podrá jugar otra partida.
Paso 7: Aumentar la dificultad a medida que se consiguen más puntos
Escribid lo siguiente en el archivo main.py
points = 0
min_bullet_speed = 1
max_bullet_speed = 1
bullets_per_gust = 1

    while running:
        pygame.display.update()
        fps_clock.tick(FPS)
        screen.fill(BLACK)

        if points >= 2000:
            bullets_per_gust = 3000
            max_bullet_speed = 80
        elif points >= 1000:
            bullets_per_gust = 3
            min_bullet_speed = 3
            max_bullet_speed = 15
        elif points >= 800:
            max_bullet_speed = 20
        elif points >= 600:
            bullets_per_gust = 2
            max_bullet_speed = 10
        elif points >= 500:
            min_bullet_speed = 2
        elif points >= 400:
            max_bullet_speed = 8
        elif points >= 200:
            # The smaller this number is, the probability for a bullet
            # to be shot is higher
            odds = 8
            max_bullet_speed = 5
        elif points >= 100:
            odds = 9
            max_bullet_speed = 4
        elif points >= 60:
            odds = 10
            max_bullet_speed = 3
        elif points >= 30:
            odds = 11
            max_bullet_speed = 2
        elif points < 30:
            odds = 12

        if random.randint(1, odds) == 1:
            for _ in range(0, bullets_per_gust):
                bullets.add(random_bullet(random.randint(min_bullet_speed,
                                                         max_bullet_speed)))
                points += 1
        draw_text('{}  points'.format(points), default_font, screen,
                  WIDTH / 2, 20, GREEN)
Las dificultad la controlamos con el número de balas por ráfaga
(bullets_per_gust), la velocidad máxima (max_bullet_speed) y mínima
(min_bullet_speed) de las balas y las probabilidades (odds de que se
dispare una ráfaga en cada iteración del bucle del juego. Dependiendo de
la puntuación, estás variables toman un valor distinto. Cuantos más
puntos tienes, más difícil se vuelve el juego.
A continuación os dejo el código definitivo del archivo main.py.
#!/usr/bin/env python
# -*- coding: utf-8 -*-
import random

import pygame
from pygame.locals import *

from block import *
from bullet import *
from global_constants import *

pygame.init()
# Display
screen = pygame.display.set_mode((WIDTH, HEIGHT))
fullscreen = False
# Window titlebar
pygame.display.set_caption('Bullet dodger')
pygame.display.set_icon(pygame.image.load('bullet.png'))
# Timing
fps_clock = pygame.time.Clock()
FPS = 60

default_font = pygame.font.Font(None, 28)


def draw_text(text, font, surface, x, y, main_color, background_color=None):
    textobj = font.render(text, True, main_color, background_color)
    textrect = textobj.get_rect()
    textrect.centerx = x
    textrect.centery = y
    surface.blit(textobj, textrect)


def toggle_fullscreen():
    if pygame.display.get_driver() == 'x11':
        pygame.display.toggle_fullscreen()
    else:
        global screen, fullscreen
        screen_copy = screen.copy()
        if fullscreen:
            screen = pygame.display.set_mode((WIDTH, HEIGHT))
        else:
            screen = pygame.display.set_mode((WIDTH, HEIGHT), pygame.FULLSCREEN)
        fullscreen = not fullscreen
        screen.blit(screen_copy, (0, 0))


def start_screen():
    pygame.mouse.set_cursor(*pygame.cursors.diamond)
    while True:
        title_font = pygame.font.Font('freesansbold.ttf', 65)
        big_font = pygame.font.Font(None, 36)
        draw_text('BULLET DODGER', title_font, screen,
                  WIDTH / 2, HEIGHT / 3, RED, YELLOW)
        draw_text('Use the mouse to dodge the bullets', big_font, screen,
                  WIDTH / 2, HEIGHT / 2, GREEN, BLACK)
        draw_text('Press any mouse button or S when you\'re ready',
                  default_font, screen, WIDTH / 2, HEIGHT / 1.7, GREEN, BLACK)
        draw_text('Press F11 to toggle full screen', default_font, screen,
                  WIDTH / 2, HEIGHT / 1.1, GREEN, BLACK)
        pygame.display.update()
        for event in pygame.event.get():
            if event.type == pygame.MOUSEBUTTONDOWN:
                main_loop()
                return
            elif event.type == pygame.KEYDOWN:
                if event.key == pygame.K_s:
                    main_loop()
                    return
                if event.key == K_F11:
                    toggle_fullscreen()
            if event.type == QUIT:
                return


def main_loop():
    pygame.mouse.set_visible(False)

    square = Block()
    square.set_pos(*pygame.mouse.get_pos())
    bullets = pygame.sprite.Group()
    running = True
    game_over = False
    points = 0
    min_bullet_speed = 1
    max_bullet_speed = 1
    bullets_per_gust = 1

    while running:
        pygame.display.update()
        fps_clock.tick(FPS)
        screen.fill(BLACK)

        if points >= 2000:
            bullets_per_gust = 3000
            max_bullet_speed = 80
        elif points >= 1000:
            bullets_per_gust = 3
            min_bullet_speed = 3
            max_bullet_speed = 15
        elif points >= 800:
            max_bullet_speed = 20
        elif points >= 600:
            bullets_per_gust = 2
            max_bullet_speed = 10
        elif points >= 500:
            min_bullet_speed = 2
        elif points >= 400:
            max_bullet_speed = 8
        elif points >= 200:
            # The smaller this number is, the probability for a bullet
            # to be shot is higher
            odds = 8
            max_bullet_speed = 5
        elif points >= 100:
            odds = 9
            max_bullet_speed = 4
        elif points >= 60:
            odds = 10
            max_bullet_speed = 3
        elif points >= 30:
            odds = 11
            max_bullet_speed = 2
        elif points < 30:
            odds = 12

        if random.randint(1, odds) == 1:
            for _ in range(0, bullets_per_gust):
                bullets.add(random_bullet(random.randint(min_bullet_speed,
                                                         max_bullet_speed)))
                points += 1
        draw_text('{}  points'.format(points), default_font, screen,
                  WIDTH / 2, 20, GREEN)
        bullets.update()
        bullets.draw(screen)

        if square.collide(bullets):
            game_over = True

        screen.blit(square.img, square.rect)
        for event in pygame.event.get():
            if event.type == pygame.MOUSEMOTION:
                mouse_pos = pygame.mouse.get_pos()
                square.set_pos(*mouse_pos)
            if event.type == QUIT:
                running = False

        while game_over:
            pygame.mouse.set_visible(True)
            # Text
            draw_text('{}  points'.format(points), default_font, screen,
                      WIDTH / 2, 20, GREEN)
            # Transparent surface
            transp_surf = pygame.Surface((WIDTH, HEIGHT))
            transp_surf.set_alpha(200)
            screen.blit(transp_surf, transp_surf.get_rect())

            draw_text('You lose', pygame.font.Font(None, 40), screen,
                      WIDTH / 2, HEIGHT / 3, RED)
            draw_text('To play again press C or any mouse button',
                      default_font, screen, WIDTH / 2, HEIGHT / 2.1, GREEN)
            draw_text('To quit the game press Q', default_font, screen,
                      WIDTH / 2, HEIGHT / 1.9, GREEN)
            draw_text('Press F11 to toggle full screen', default_font, screen,
                      WIDTH / 2, HEIGHT / 1.1, GREEN, BLACK)

            pygame.display.update()

            for event in pygame.event.get():
                if event.type == pygame.KEYDOWN:
                    if event.key == K_F11:
                        toggle_fullscreen()
                    if event.key == pygame.K_q:
                        game_over = False
                        running = False
                    elif event.key == pygame.K_c:
                        game_over = False
                        main_loop()
                        return  # Avoids recursion
                if event.type == pygame.MOUSEBUTTONDOWN:
                    game_over = False
                    main_loop()
                    return
                if event.type == QUIT:
                    game_over = False
                    running = False

start_screen()
pygame.quit()
Hemos terminado
Si has logrado hacer funcionar el juego, ¡enhorabuena! Si te ha quedado
alguna duda, hay algo que no entiendas o crees que he cometido un error,
por favor, deja un comentario. El código fuente completo de este juego
lo he incluido en un repositorio llamado pygame_stuff. El repositorio
también contiene otros juegos y plantillas de código para facilitar la
tarea de programar usando pygame. Con la dirección
https://notabug.org/jorgesumle/pygame_stuff puedes acceder al código y
clonar el repositorio
(git clone https://notabug.org/jorgesumle/pygame_stuff).
Comentarios